Terrain Generators
intermediate conceptsVoxel Play 4 · World Architecture
Each World Definition must have a Terrain Generator assigned in its terrain generator field:

The terrain generator decides the shape and contents of the world. Depending on the generator type, it can provide a classic heightmap or a full 3D density field, as well as the biome IDs used for surface voxels, vegetation, trees and water.
When Voxel Play 4 creates a new world, it also creates and assigns a 3D Terrain Generator with a small working graph that ends in Density Output.
Generator Types
Right-click in the Project window and open Create > Voxel Play > Terrain Generators. The menu contains:
- 3D Terrain Generator: the default and recommended graph-based generator. It evaluates density in X, Y and Z, so it supports heightmap terrain as well as caves, overhangs and floating islands.
- Multi-Step Terrain Generator: the classic 2D graph. It produces altitude and moisture values and remains fully supported for heightmap worlds.
Cave water: caves opened below the water level are not flooded column by column any more. An aquifer field decides, per position, which underground pockets hold water, so a cave under the sea can stay dry and a flooded gallery keeps a consistent level along its length. Cave openings that would spill into the open air or into the seabed are sealed with a dirt barrier instead. Nothing to configure: it applies to any world with water and a biome water voxel. - Unity Terrain Generator: imports its terrain shape from a Unity Terrain.
- Fast Flat Terrain Generator: a lightweight generator for a simple flat world.
Converting a 2D Graph to 3D
Select a Multi-Step Terrain Generator asset and click Convert to 3D Graph in its Inspector. Voxel Play creates a sibling asset whose name ends in 3D, converts the compatible nodes and assigns the new generator to every World Definition that used the source asset. The original 2D generator is left unchanged. Review the converted graph and any warnings before continuing, since inherently 3D presets may benefit from manual adjustments.
Terrain Graph Editors
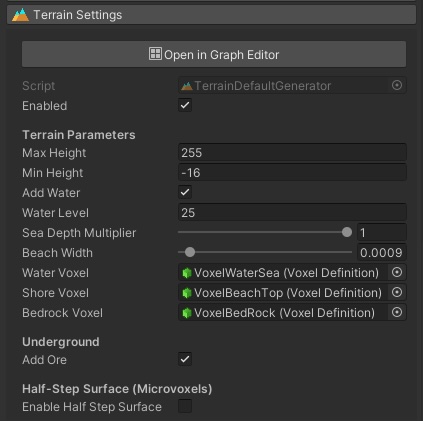
The 3D and Multi-Step generators each provide a visual, node-based editor. Select the generator asset and click Open in 3D Graph Editor (3D Terrain Generator) or Open in Graph Editor (Multi-Step Terrain Generator) in its Inspector:
- The 3D Terrain Graph produces density and optional voxel, vegetation, tree and water IDs. See the 3D Terrain Graph guide and the node reference.
- The Multi-Step Terrain Graph produces altitude and moisture for classic heightmap terrain. Its interface and nodes are summarized below.
The Inspector also exposes the main terrain parameters:
- Max Height: maximum terrain altitude in voxels (default 255).
- Min Height: minimum terrain altitude. Negative values allow underground depth.
- Ground Offset: shifts the whole generated world by an offset in voxels (X, Y, Z). Terrain, water level, biomes and geological strata move as a unit, so different generators can be aligned to a common ground level. This is an authoring-time setting: changing it on an already edited world misaligns previously saved content.
- Add Water / Water Level: enables water generation and sets the water level in voxels.
- Sea Depth Multiplier: scales depth below sea level for deeper or shallower oceans.
- Beach Width: controls the shore voxel area around the water line.
- Water Voxel / Shore Voxel / Bedrock Voxel: voxel definitions used for water, beaches and the bottom layer.
- Add Ore: enables ore generation underground based on biome settings.
- Enable Half Step Surface: uses microvoxels for smoother terrain surfaces.
2D Graph Editor Interface
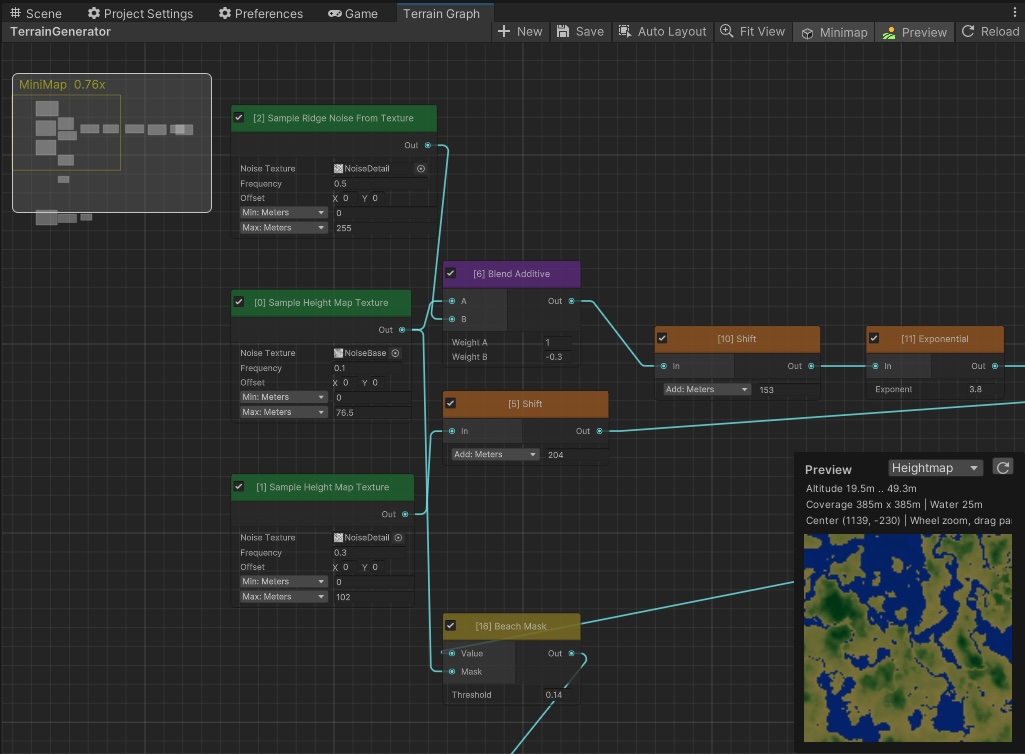
The Graph Editor window is divided into the following areas:
- Toolbar: buttons for creating new graphs (New), saving (Save or Ctrl+S), auto-arranging nodes (Auto Layout), fitting the view (Fit View), toggling the minimap and preview panel, and reloading.
- Canvas: the main area where nodes are placed and connected. Scroll to zoom, drag to pan.
- MiniMap: a small overview in the top-left corner showing the full graph layout.
- Preview panel: shown in the bottom-right corner, it renders a real-time heightmap or biome preview of the terrain produced by the current graph. It displays altitude range, coverage area and water level. Click on the preview to inspect values at a specific world position.
Working with Nodes
Right-click on the canvas to open the Create Node menu. Nodes are organized into four categories, each with a distinct color:
| Category | Color | Description |
|---|---|---|
| Samplers | Green | Generate initial terrain values from noise textures, fractal noise, Unity Terrain data, constants or random values. |
| Math | Orange | Transform a single value: shift, invert, scale, exponent, clamp, flatten/raise, island falloff. |
| Blending | Purple | Combine two input values using additive or multiplicative blending with custom weights. |
| Filters | Yellow | Conditional operations: threshold, fill, test, copy and beach mask. |
Each node shows its input ports on the left and output port on the right. To connect nodes, drag from an output port to an input port. Values flow through connections and are evaluated in topological order.
The 2D Multi-Step graph has two special output nodes:
- Altitude Output: the final terrain height value (normalized 0 to 1).
- Moisture Output: an optional secondary value used together with altitude for biome selection.
Click on a node title to collapse or expand its parameters. Height fields can be edited as Normalized, % Max Height or Meters using the dropdown next to the field; changing the display unit does not change the stored value.
Available Node Operations
The following operations are available as nodes in the Graph Editor. Each node produces a float output value that can be connected to other nodes:
Samplers (green nodes - generate initial values):
- Sample Height Map Texture: reads a value from a 2D noise texture. Configure frequency (sampling scale) and output range (min/max) to remap values.
- Sample Ridge Noise From Texture: similar to Sample Height Map Texture but applies a ridge formula:
2 * (0.5 - abs(0.5 - value)). Produces acute reliefs, useful for rivers (when inverted) or pointy mountains. - Sample Heightmap Fractal: generates Perlin fractal noise with configurable octaves, persistence and lacunarity for detailed, natural-looking terrain.
- Ridge Noise Fractal: procedural ridge noise with no texture required. Inverts the fractal around its midpoint to produce mountain ridgelines.
- Cellular Noise: procedural cellular (Worley) noise. Cells mode outputs the distance to the nearest cell centre (regions, plateaus), Edges mode outputs the borders between cells (cracks, rivers, biome frontiers).
- Sample Heightmap from Unity Terrain: reads height data from an existing Unity Terrain asset in the scene.
- Constant: outputs a fixed constant value.
- Random: produces a deterministic pseudo-random value (0-1) based on world X/Z position.
Math (orange nodes - transform a single value):
- Shift: adds a constant to the input value. Supports both normalized and meter units.
- Invert: outputs
1 - input. - Add and Multiply: computes
(input + Add) * Multiply. - Multiply And Add: computes
(input * Multiply) + Add. - Exponential: raises the input to a power. Useful to accentuate valleys and mountain shapes.
- Flatten or Raise: if the input is above a threshold, multiplies it by a factor. Values below the threshold pass through unchanged.
- Clamp: constrains the value to a given min/max range.
- Island: reduces the height based on distance from the world origin, creating island-like falloff.
Blending (purple nodes - combine two values):
- Blend Additive: combines two inputs with custom weights:
A * WeightA + B * WeightB. - Blend Multiply: multiplies two input values together.
Filters (yellow nodes - conditional operations):
- Threshold: if the input is greater than or equal to a threshold, outputs that value plus an optional shift. Otherwise outputs a fallback constant.
- Fill: replaces any value within a given range with a constant. Values outside the range pass through.
- Test: outputs 1 if the input falls inside a given range, otherwise outputs 0.
- Copy: explicitly references and passes through a previous node's output.
- Beach Mask: suppresses beach/shore voxels in areas where the mask input exceeds a threshold.
Feel free to experiment with nodes and see the effect on the world. We recommend enabling the Render In Editor toggle so you can test the changes inside the Scene View.
About Biomes
The terrain generator is responsible for producing an altitude and moisture (humidity) value for any world position. Using this altitude and moisture, Voxel Play 4 looks up the matching biome and picks the appropriate voxel definition for the surface and the underground voxels.
Check the biome definitions page for more details about how to define biomes based on altitude and moisture ranges.
Complete world & terrain generation tutorial
Coding Your Own Terrain Generator
The default terrain generator covers most use cases with its graph-based pipeline, but sometimes you need full control - procedural planets, custom noise algorithms, importing external heightmap data, or game-specific terrain logic. In those cases, you can write your own terrain generator by subclassing VoxelPlayTerrainGenerator.
Mathf, Vector3, textures) inside any method.
How generation works: When a chunk needs terrain, Voxel Play 4 creates an empty chunk (16x16x16 voxels) and calls your PaintChunk method. Your job is to fill the chunk's voxels array with the appropriate voxel types. Return true if you placed any voxels, or false if the chunk is empty (e.g. it's entirely above the terrain surface).
API Reference
abstract bool PaintChunk(VoxelChunk chunk)
The only required method. Called once per chunk when it first needs terrain. Fill chunk.voxels[] with your terrain data. Return true if the chunk contains any voxels, false if it's empty.
The chunk's world position is available via chunk.position (a Vector3d). You'll typically compute the chunk's vertical range, determine which voxels should be solid, water, or air, and write them using the fast voxel helpers listed below.
virtual void Init()
Called once when the world initializes. Use it to set up noise generators, load textures, cache voxel definitions, or pre-compute lookup tables. This is the right place for any one-time setup that your PaintChunk method will rely on.
virtual void GetHeightAndMoisture(double x, double z, out float altitude, out float moisture)
Called by Voxel Play 4 to determine biome selection at a given world position. Override this if your terrain generator computes its own heightmap - return the normalized altitude (0..1 relative to max height) and moisture values so VP can pick the correct biome. If you don't override it, biome selection is disabled.
virtual void GetTerrainVoxelDefinitions(List<VoxelDefinition> voxelDefinitions)
Add all voxel definitions your generator uses to the provided list. This helps Voxel Play 4 register them properly in the editor and ensures they're available during chunk generation. If not overridden, a warning is logged - it's recommended to implement this even if your generator only uses a few voxel types.
virtual bool GetTerrainBounds(out Vector3 center, out Vector3 size)
Override this method to report the terrain area bounds. Voxel Play 4 uses this information to constrain features like Start On Flat spawning to valid terrain positions in non-infinite worlds. Return true if your generator has specific bounds, or false (the default) if the terrain extends indefinitely. The Unity Terrain Generator overrides this automatically using the TerrainData dimensions.
Chunk Layout
Each chunk is a flat array of 4096 voxels (16x16x16). Use these constants to calculate indices:
ONE_Y_ROW = 256(16 x 16) - offset to move one row up in YONE_Z_ROW = 16- offset to move one row in Z- Index formula:
index = y * ONE_Y_ROW + z * ONE_Z_ROW + x
These constants are available as protected fields in VoxelPlayTerrainGenerator.
Voxel Helpers
Use these methods on chunk.voxels[index] to set voxel data efficiently:
| Method | Use for |
|---|---|
SetFastOpaque(VoxelDefinition type) | Solid terrain voxels (dirt, stone, sand). Fastest option - sets full opacity. |
SetFastWater(VoxelDefinition type) | Water and other fluid voxels. |
Set(VoxelDefinition type) | General-purpose setter. Slightly slower but handles any voxel type. |
Set(VoxelDefinition type, Color32 tint) | Same as above but also applies a color tint. |
Example: Simple Flat Terrain Generator
using UnityEngine;
using VoxelPlay;

[CreateAssetMenu(menuName = "Voxel Play/Terrain Generators/Flat Terrain",
                 fileName = "FlatTerrainGenerator", order = 200)]
public class FlatTerrainGenerator : VoxelPlayTerrainGenerator {

    [Header("Flat terrain settings")]
    public int altitude = 40;
    public VoxelDefinition terrainVoxel;
    public Color32 voxelColor = new Color32(255, 255, 255, 255);

    public override bool PaintChunk(VoxelChunk chunk) {
        // Bottom Y position of this chunk in world space
        int chunkBottomY = FastMath.FloorToInt(
            chunk.position.y - VoxelPlayEnvironment.CHUNK_HALF_SIZE);

        // If the entire chunk is above our terrain, skip it
        if (chunkBottomY >= altitude) {
            return false;
        }

        // How many rows (in local Y) are solid inside this chunk
        int maxY = altitude - chunkBottomY;
        int lastVoxel = maxY * ONE_Y_ROW;
        if (lastVoxel > chunk.voxels.Length)
            lastVoxel = chunk.voxels.Length;

        // Fill solid voxels
        for (int k = 0; k < lastVoxel; k++) {
            chunk.voxels[k].Set(terrainVoxel, voxelColor);
        }

        // Mark surface chunks so VP computes lighting correctly
        int chunkTopY = (int)chunk.position.y
            + VoxelPlayEnvironment.CHUNK_HALF_SIZE;
        chunk.isAboveSurface = chunkTopY >= altitude;

        return true;
    }
}chunk.isAboveSurface = true for chunks at or above the terrain surface. Voxel Play 4 uses this flag to optimize lighting calculations - without it, surface chunks may appear incorrectly lit.
Suggest an improvement
Help us improve this documentation page.