Set a New World — Step by Step
beginner quick startLearn how to configure a new world in Voxel Play 4, step by step, in a few minutes.
Step 1:
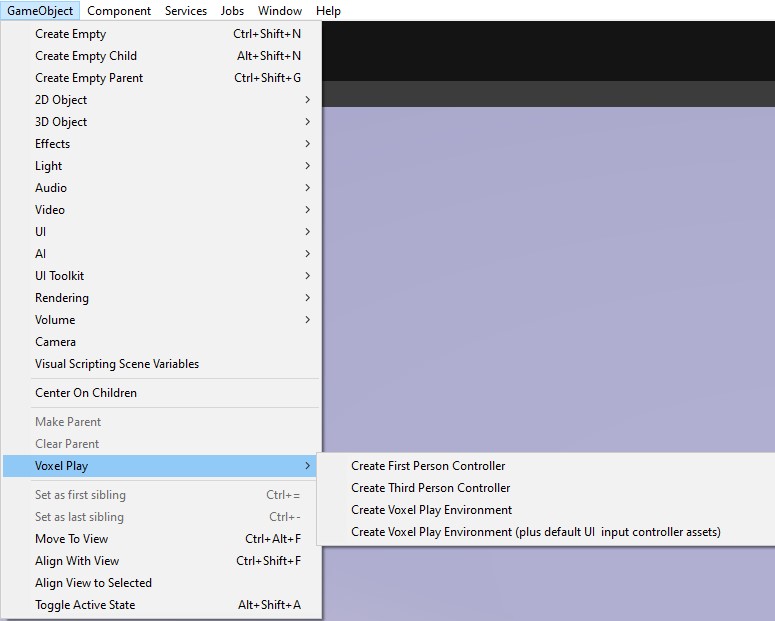
Go to GameObject - Voxel Play - Create Voxel Play Environment (you can select the default Voxel Play Environment, or with the UI elements). In our case, and to make things more fluid, we will select the second option that will also save you time.
Step 2:
Create or assign a new World Definition asset, by selecting Voxel Play Environment and hitting “Create”.
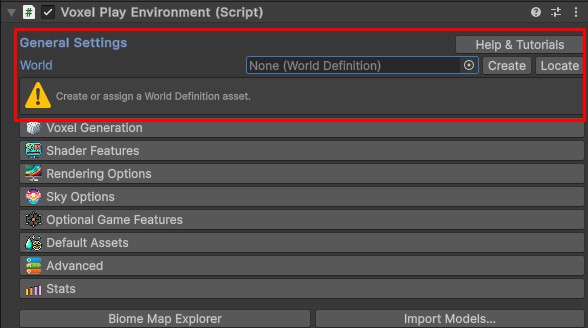
You will see that the world editor now is enabled, and you can start editing the chunks that are generated in the world.
Step 3:
Now define how the terrain is shaped. Select the Voxel Play Environment, go to World Settings > Terrain Generator and open the assigned Terrain Generator. The generation pipeline is built visually in the Terrain Graph Editor: click Open in Graph Editor in the generator’s Inspector (the old inline Steps list has been replaced by this node-based editor).
When you hit Create, Voxel Play 4 also generates a default Terrain Generator so the world is playable right away. That default generator is a 3D Terrain Generator, which is what this tutorial uses. If you are opening an older project built on the 2D Multi-Step Terrain Generator, either follow the 2D variant at the end of this step, or press Convert to 3D Graph in the generator’s Inspector to migrate it.
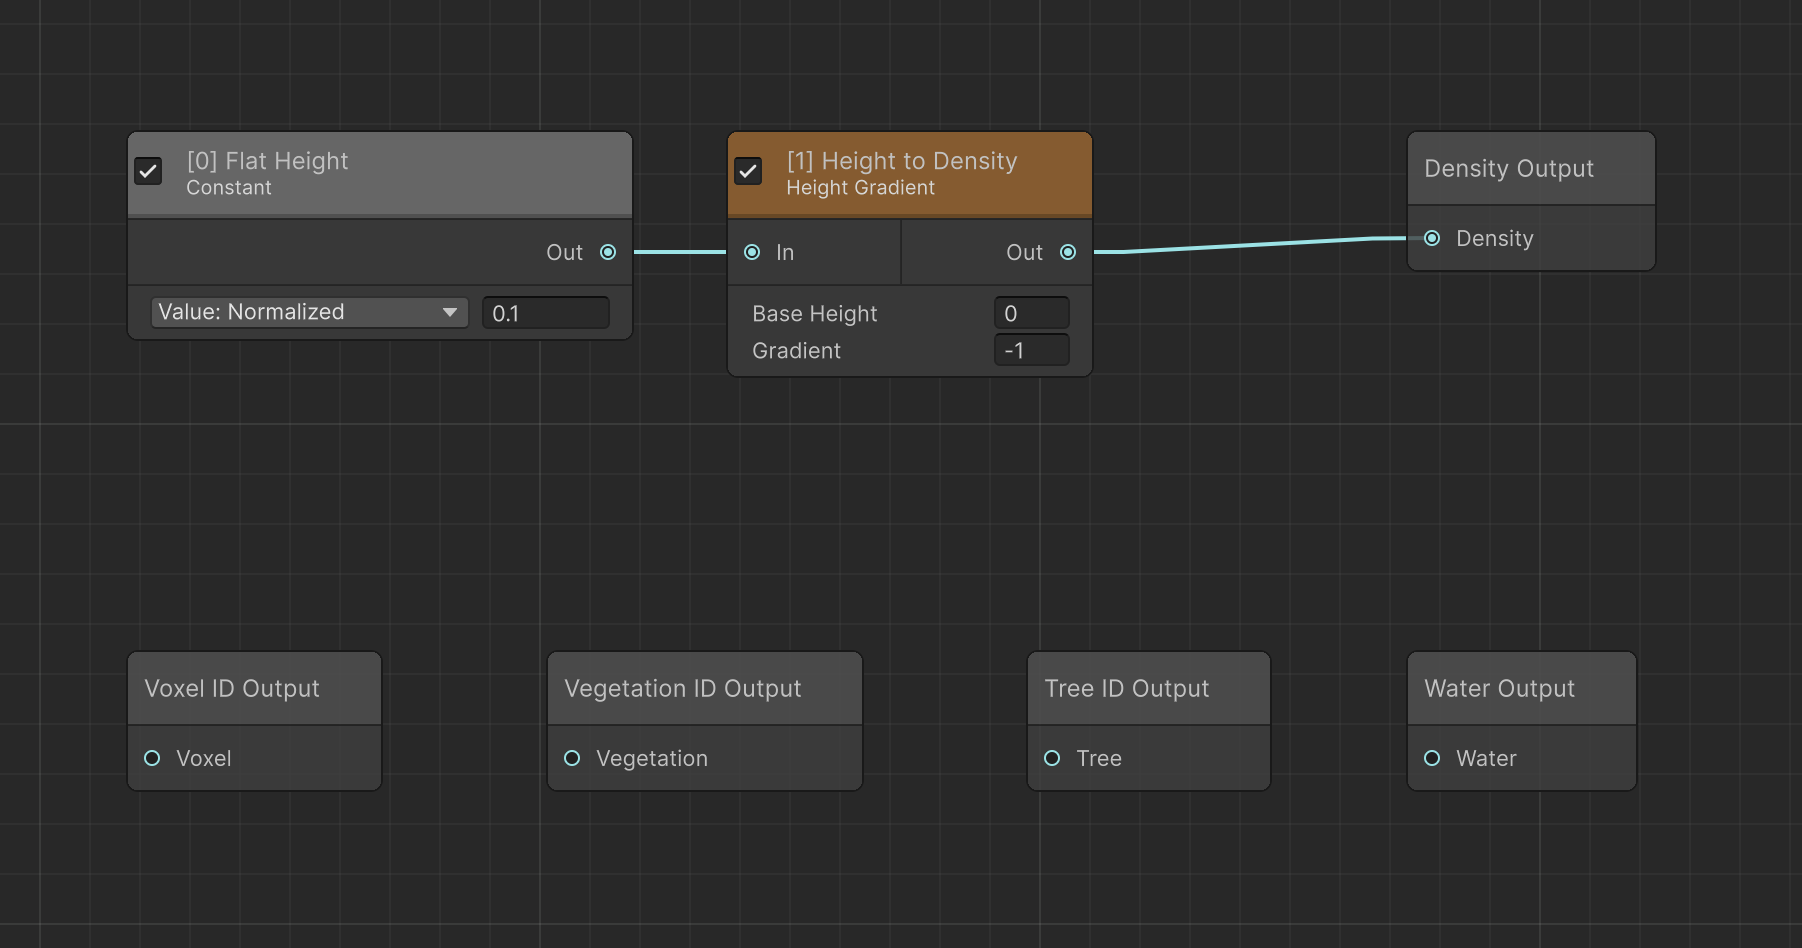
Opening the default generator in the Graph Editor reveals a two-node chain: a [0] Flat Height node (a Constant of 0.1, which is 25.5 meters of the 255 Max Height) feeding a [1] Height to Density node (a Height Gradient with Base Height 0 and Gradient -1), wired to the Density Output.
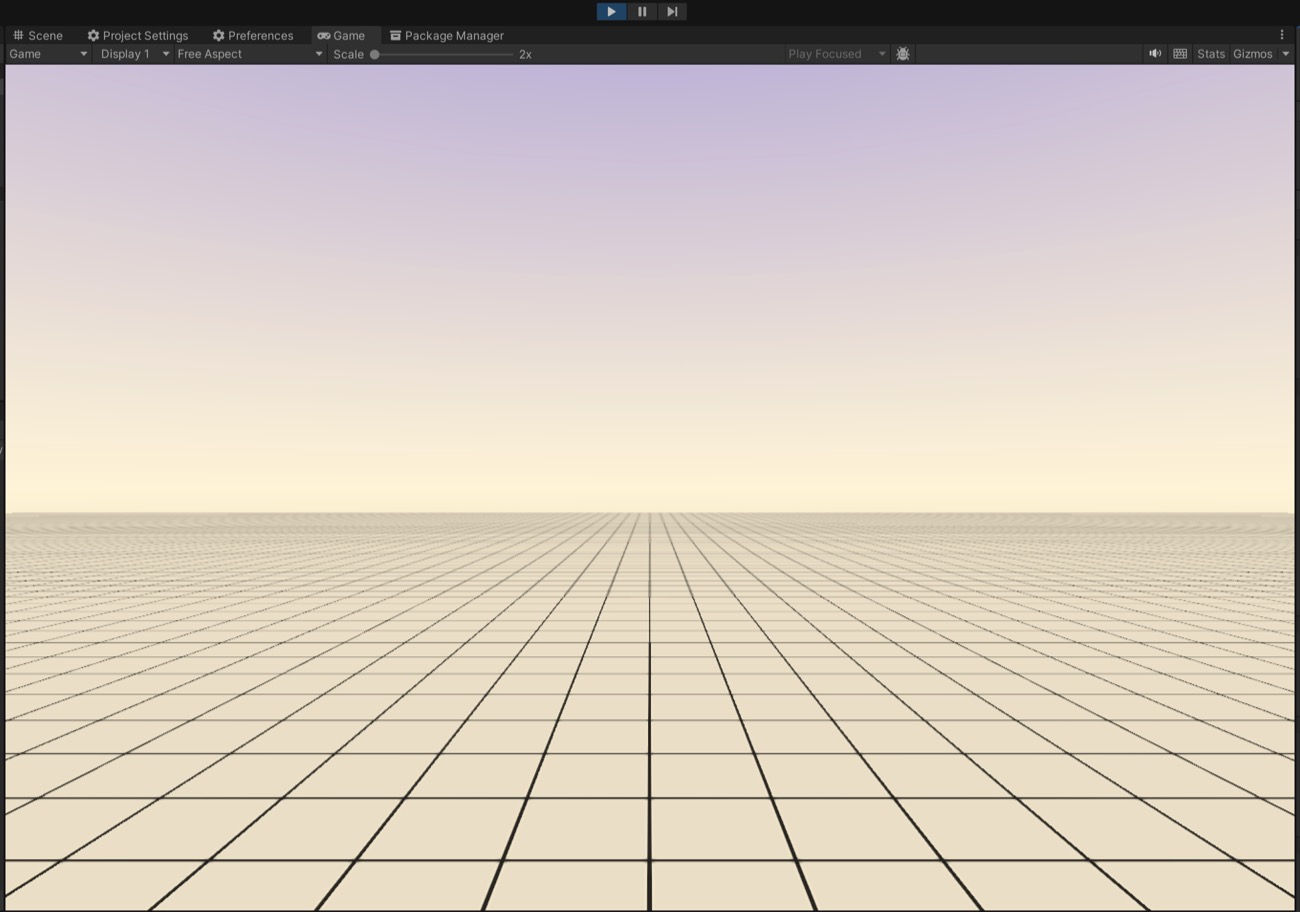
With this default setup, if you place the camera at an altitude of 30 and press Play, you will see a flat plain stretching to the horizon:
In the graph you connect nodes that produce a density value for every world position: positive is solid, zero or below is air. Right-click on the canvas to open the Create Node menu and pick the nodes you need, then drag from each node’s output port to the next node’s input port. Every graph ends in a Density Output node. The Voxel ID, Vegetation ID, Tree ID and Water Output ports are optional and can be left unconnected.
Working with density is what allows overhangs, caves and floating islands, but for classic heightmap terrain you do not need to think in 3D at all. Build a height value exactly as you would in a 2D graph, then feed it into a Height Gradient node with Base Height = 0 and Gradient = -1. That node turns the height into a solid-below, air-above density field, placing the surface at height x Max Height. Everything upstream of it is plain 2D logic.
Height values in a 3D graph are stored normalized: 1 means Max Height. Height-capable fields let you choose Normalized, % Max Height or Meters from the dropdown next to the field. This only changes how you enter and read the value; the graph still stores the same normalized value, so switching units does not alter the terrain. Keep Normalized for density, noise and other dimensionless values.
Our goal is to create a Desert environment. Delete the [0] Flat Height node, keep the Height to Density node, and build the chain below:
- Noise 2D Texture (Samplers 2D category): generates the base relief from a heightmap texture, which you assign in the node’s Noise Texture slot. The Frequency controls how stretched or repeated the pattern is; here we use 1. Switch Min and Max to Meters and set Min = 0 and Max = 20, so the sampled relief spans from 0 to 20 meters of altitude.
- Threshold (Filters category): this is the node that turns the noisy relief into a flat desert floor with isolated dunes, and it is the part that usually causes confusion, so here is exactly what it does. It acts as a cutoff on the incoming height: if the value is greater than or equal to the Threshold it passes through unchanged (plus the optional If Greater, Add); if it is below, it is replaced by the constant If Not, Output value. Switch the three unit dropdowns to Meters, then set Threshold = 10, If Greater, Add = 0 and If Not, Output = 10. Every point lower than 10 m collapses to a flat floor at 10 m, while only the parts of the heightmap that rise above 10 m keep their height and stand out as dunes. The result is flat desert ground with isolated dune clusters poking out, instead of one continuous bumpy surface. Connect the sampler output into the Threshold input.
- Height Gradient (Terrain Shapers category): converts the height coming out of the Threshold into the density field the graph expects. This is the Height to Density node already present in the default generator, so just reuse it: Base Height = 0, Gradient = -1. Connect the Threshold output into its input, and its output into the Density Output.
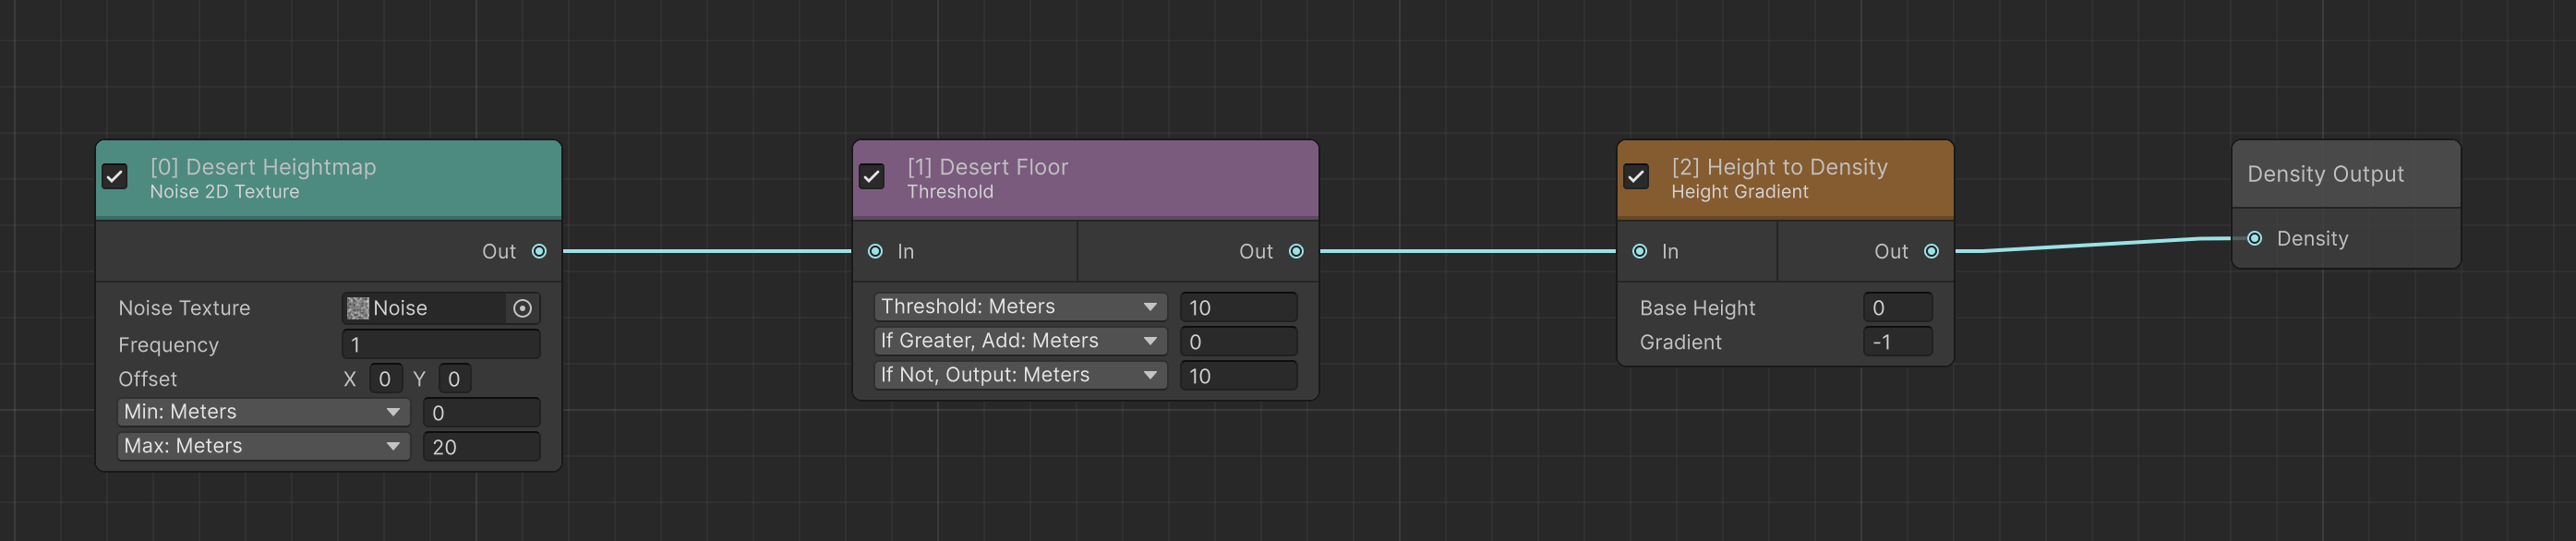
Notice there is no moisture node here. In a 3D graph the biome is chosen by a Climate Map node wired to the Voxel ID Output, and you only need it once the world has several biomes (see Step 7). Leave those outputs unconnected and the whole world uses the default Biome, which is exactly what a single-biome desert wants.
Enable the Sync toggle in the toolbar (or press Update World) to see the terrain refresh in the scene as you tweak the nodes. When you are happy with the result, hit Save (Ctrl+S / Cmd+S). For a full reference of every node and toolbar option, see the Terrain Graph Editor page.
2D variant: Multi-Step Terrain Generator
The 2D graph is still fully supported. You can create one with Create > Voxel Play > Terrain Generators > Multi-Step Terrain Generator and assign it in World Settings > Terrain Generator. It works with altitude instead of density, so it cannot produce overhangs or caves, but it exposes the meters and percentage unit selector on every height field and the desert recipe above maps to it directly.
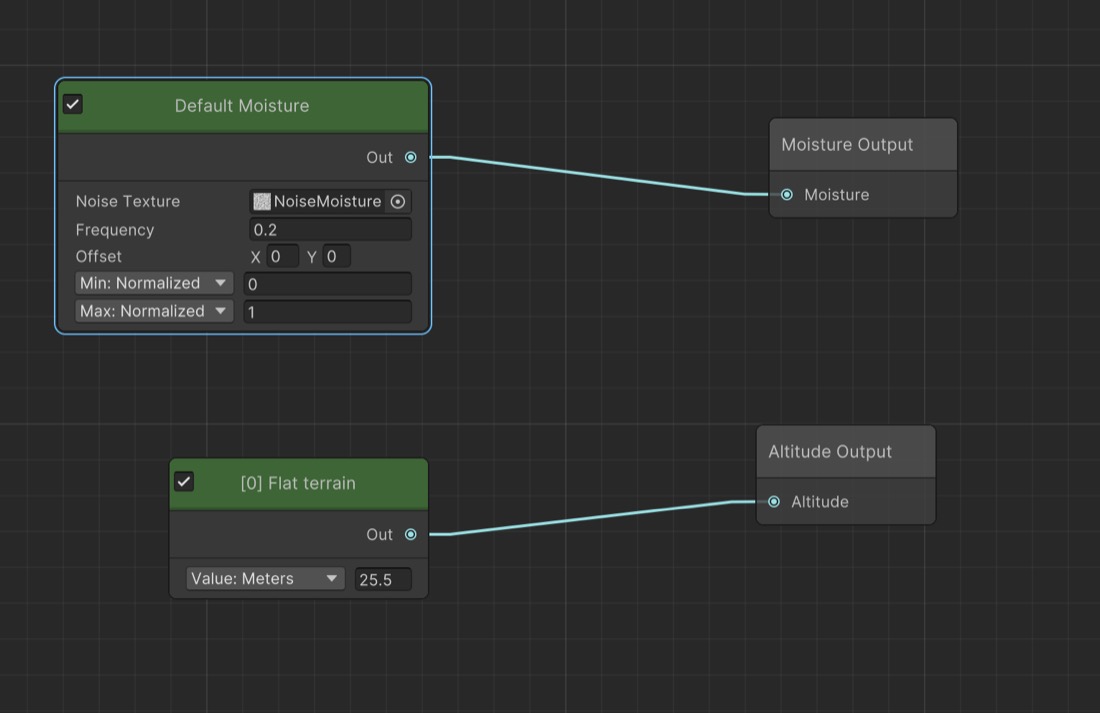
Its default generator has a [0] Flat terrain node, a constant altitude of 25.5 meters, wired to the Altitude Output, and a Default Moisture node, which samples the built-in NoiseMoisture texture, wired to the Moisture Output:
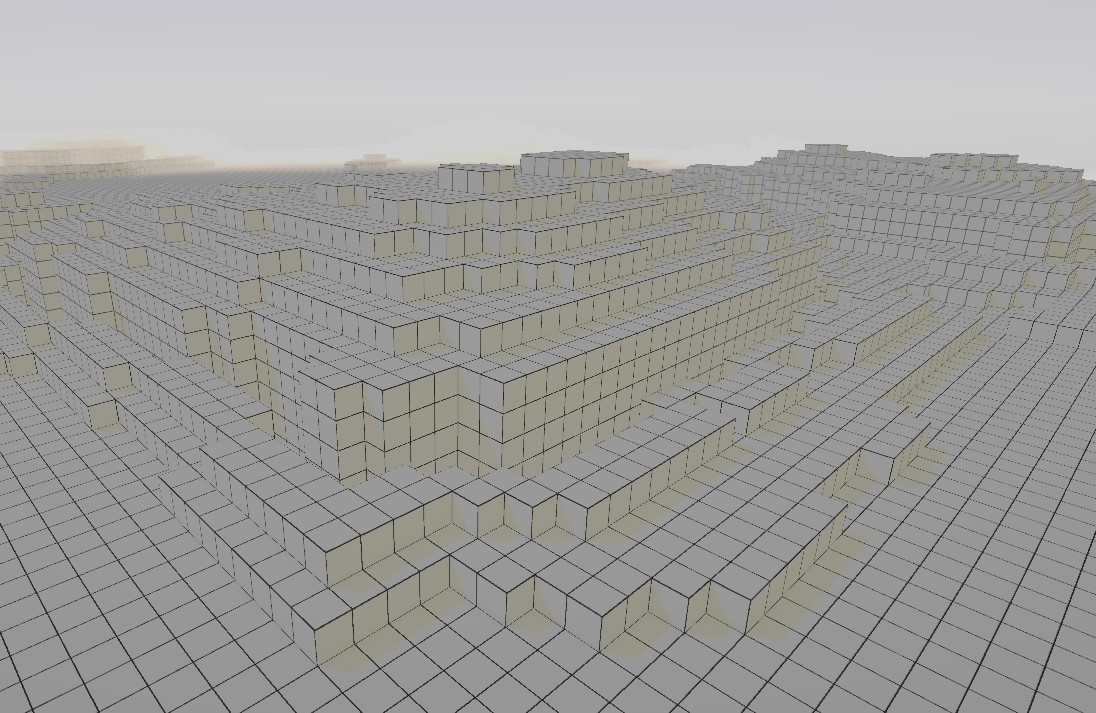
Delete both, then add a Sample Height Map Texture node and a Threshold node with the same settings as above, this time entering them in Meters: Threshold = 10, If Greater, Add = 0, If Not, Output = 10. Wire the Threshold straight into the Altitude Output; no Height Gradient node is needed, since a 2D graph already works in altitude:
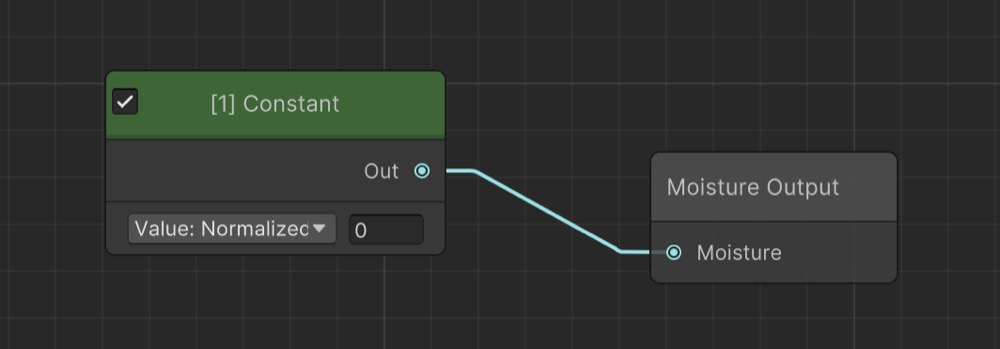
A desert should be dry, so add a Constant node, leave its value at 0 (Normalized), and wire it to the Moisture Output. This overrides the default moisture noise and keeps the whole map dry:
Step 4:
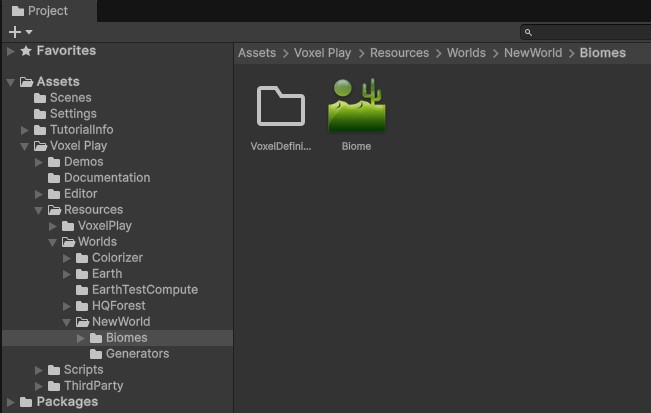
When you hit Create back in Step 2, Voxel Play 4 already generated a Biomes folder under Voxel Play - Resources - Worlds - [Name of your World], containing a default Biome asset. This folder is where we define the visual components of the scene, like textures, trees, vegetation and more. Open it and, inside, create a folder to hold your Voxel Definitions.
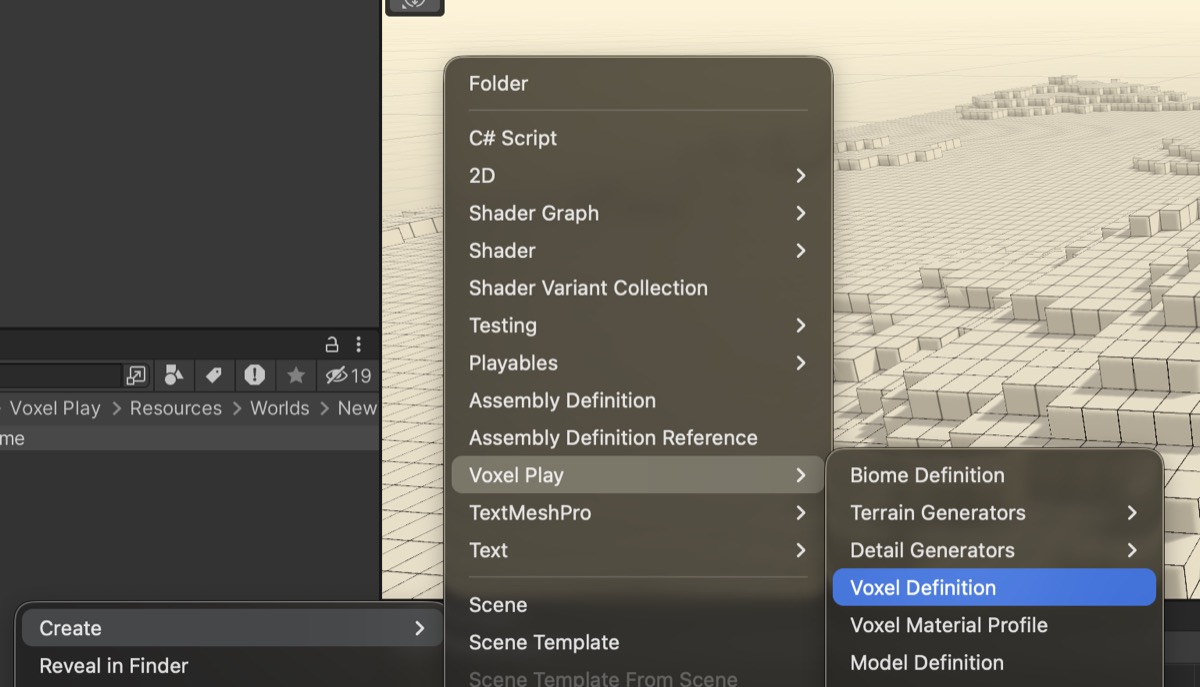
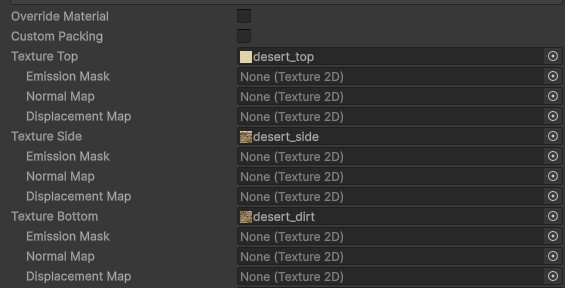
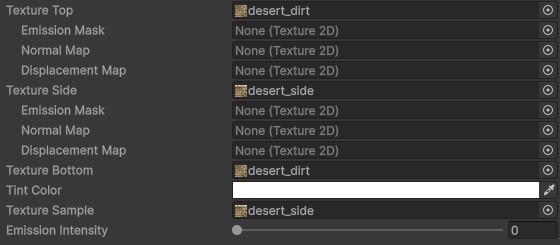
Inside the folder, Right Click - Create - Voxel Play - Voxel Definition and give it a name, for example DesertTop. Assign the Texture Top, Texture Side and Texture Bottom in their slots. Now duplicate the Voxel Definition, name it DesertDirt for example. And assign the dirt texture.
Step 5:
Open the default Biome asset (inside the Biomes folder) and assign your desert Voxel Definitions to its slots: DesertTop goes in Voxel Top (the surface voxel) and DesertDirt goes in Voxel Dirt (the underground voxel, shown on the exposed dune sides and below the surface). Hit Reset World and the textures will be applied, giving your voxel scene its first real look.
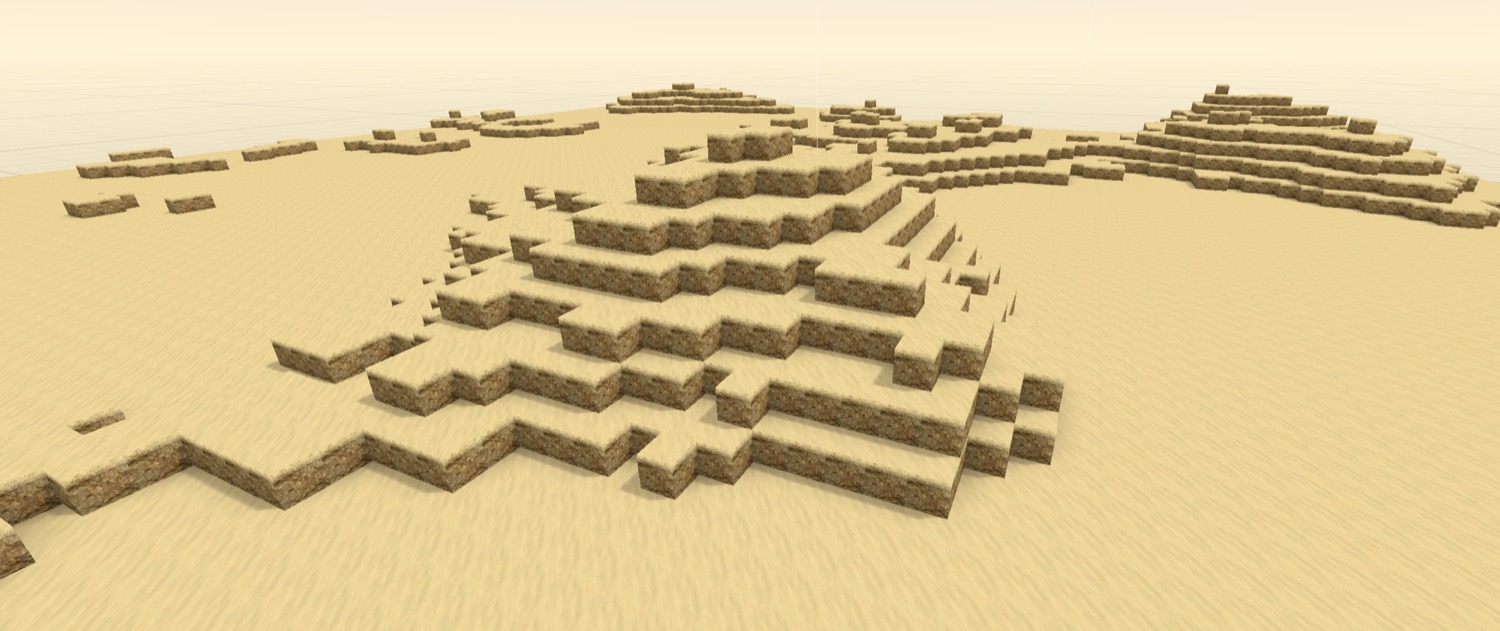
Press Play with the camera placed close to but above the surface (around 50 meters of altitude) and you will see the textured desert: a sandy surface with the dirt sides of the dunes exposed.
Step 6:
Now that the world is created and ready to be played on, the next step is to create our First Person Controller. Go to "GameObject - Voxel Play - Create First Person Controller".
Now we have a First Person Controller created with all the dependencies. As a hint, we recommend activating the “Start on Flat” option, which allows the First Person Controller to start on a flat surface in the project, instead of being placed on an irregular surface.
At this point, if you hit play, everything will work well and your voxel world is ready to further be shaped as you desire.
Step 7:
It's time to add some trees, vegetation, ores and define other additional settings that might correspond to your scene, like underwater plants and more, which is not our case.
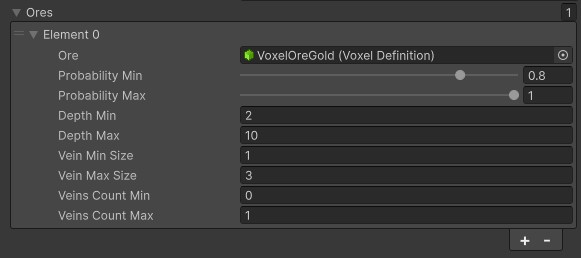
I will define a gold element in the “Ores” tab (found in the Biome element):
- Add the element
- Assign de Voxel Definition (texture)
- Define the probability of finding this ore
- Set the veins size end count
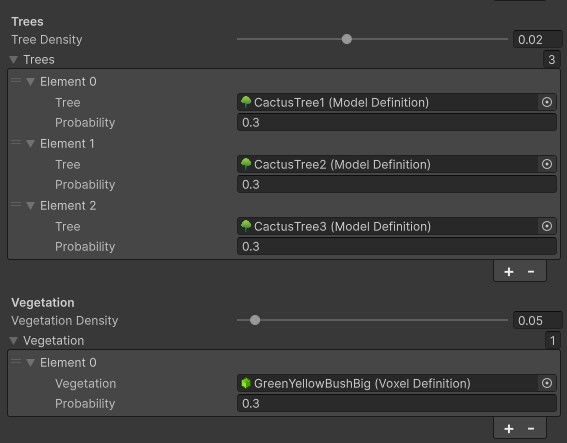
Now set the tree density and add the tree elements with the probability of spawning from 0 to 1. In this case we configured 3 cactus types with equal probability of spawning.
The same steps apply for the vegetation:
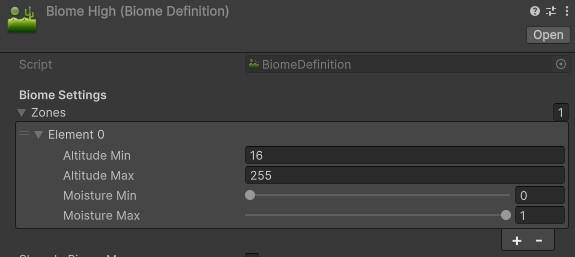
Additionally, you can assign different biomes with different settings. For example, I want higher points of the environment to avoid spawning trees and vegetation. To do that, I will duplicate my current biome, give it a different name, and disable trees and vegetation, and finally define the altitude from which each biome should be rendered.

First, select the Voxel Play Environment and add both Biome assets under World Settings > Biomes. Their order in this list defines the biome IDs returned by the graph:
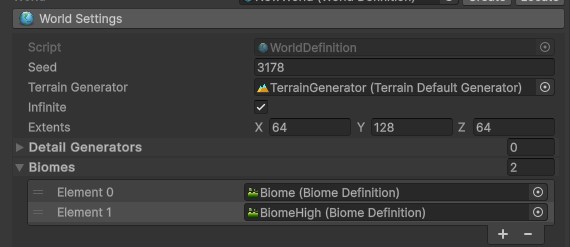
Now return to the 3D Terrain Graph and connect the biome selection:
- Add a Constant node with Value = 0 (Normalized) for a dry desert moisture value.
- Add a Climate Map node from the Biome category.
- Branch the height coming from the Threshold output—before Height to Density—into the Climate Map’s Altitude input. Keep the existing Threshold → Height to Density → Density Output connection as it is.
- Connect the Constant to Moisture. Leave Temperature unconnected unless your biome zones use temperature ranges.
- Connect Voxel ID, Vegetation ID and Tree ID from Climate Map to the matching graph output nodes. Leave Water ID unconnected unless you want the biome map to place water directly.
- Press Save, then Update World or Reset World to regenerate the terrain.
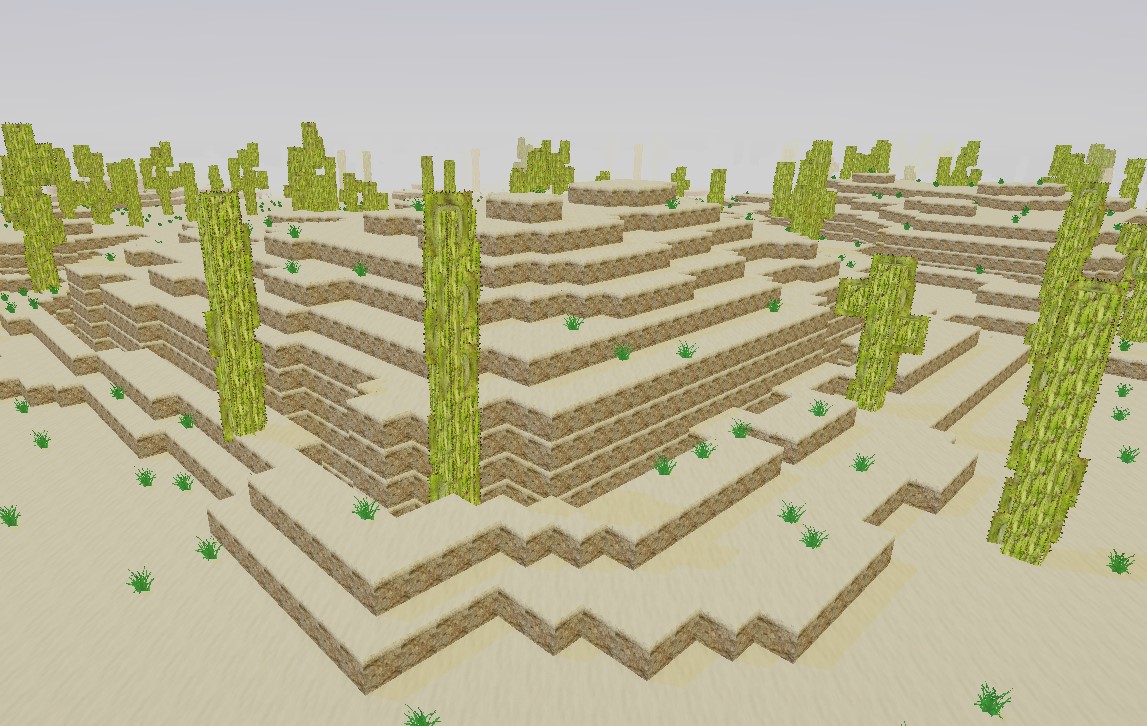
This is how our world looks after all the finished configuration:
Suggest an improvement
Help us improve this documentation page.