Special Features
intermediate conceptsVolumetric Fog & Mist 2 (URP) · Core Concepts
Blue Noise Support
This option can reduce the moiré-pattern effect on dark areas due to a very high jitter value. In general, try to reduce jitter as much as possible.
Enable it in “Shader Options” section in Volumetric Fog Manager.
You can also locate and edit CommonsURP.hlsl file and uncomment this line:
#define FOG_BLUE_NOISE
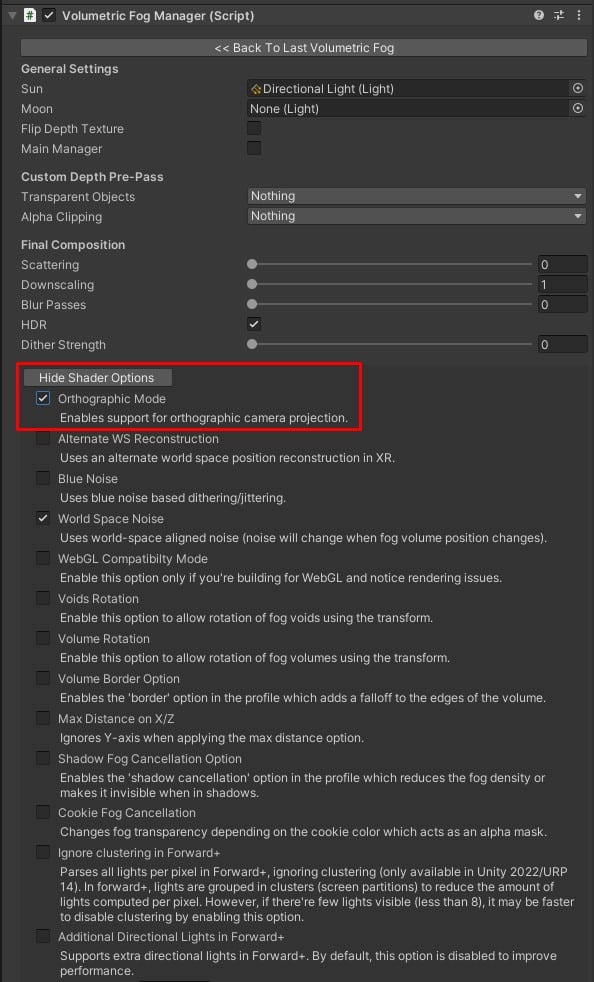
Orthographic Camera Support
Enable it in “Shader Options” section in Volumetric Fog Manager.
Fog Voids
A fog void is a circular area which is not covered by fog. Up to 8 fog voids can be applied to a fog volume. The Fog Void Manager component is responsible for sending the fog void positions and sizes to the shaders:

The Fog Void Manager sorts fog voids by distance to the Tracking Center. You can adjust the time interval for looking new fog voids.
To add a Fog Void to the scene, right click in the Hierarchy and select “Effects” -> “Volumetric Fog & Mist 2” -> Fog Void.
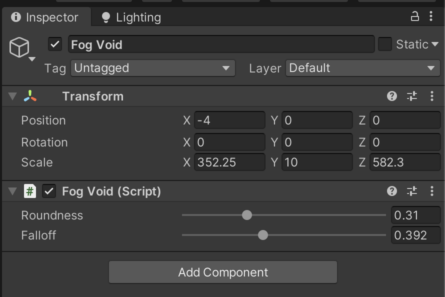
You can position / scale the fog void anywhere in the scene. Also, you can parent a fog void around characters so they will not be covered by fog. Fog voids can also be grouped or parented. Use the Roundness and Falloff slider of the Fog Void component to customize the appearance of each void.
Check this video for an example:
Native Lights
Enabling native lights in the volumetric fog inspector will cast spotlight, point lights and other light types on the fog, including support for shadows. If you enable this option, make sure the URP asset has additional lights/shadows enabled and that the spot/point lights have shadows enabled (if you also wish to render the shadows over the fog).
Point lights with shadows require Unity 2022.3 or later.
Volumetric Fog & Mist 12 is compatible with native lights in forward, forward+ and deferred rendering path. This option requires a fast graphics card. If you experience performance issues, switch to “Enable Point Lights” option which uses a faster implementation although it only supports point lights without shadows.
In forward+, URP groups lights in screen tiles (clustering) making it possible to handle many lights (up to 256, depending on the platform). However, performance will be affected if many lights overlap and are included in the same tile. To improve performance try to reduce the light ranges, number of nearby lights or use the Fast Point Light as a fallback option.
Rendering Lights
Excluding Volumetric Fog & Mist 2 from specific lights when using Native Lights option:
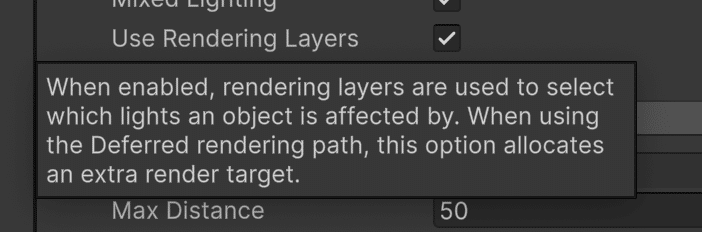
Step 1: Go to your URP asset and make sure the “Use Rendering Layers” is enabled:
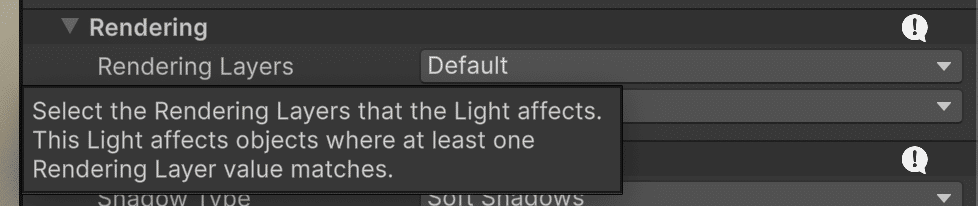
Step 2: In your Light component, Rendering section, you can choose which rendering layers are affected by the light:
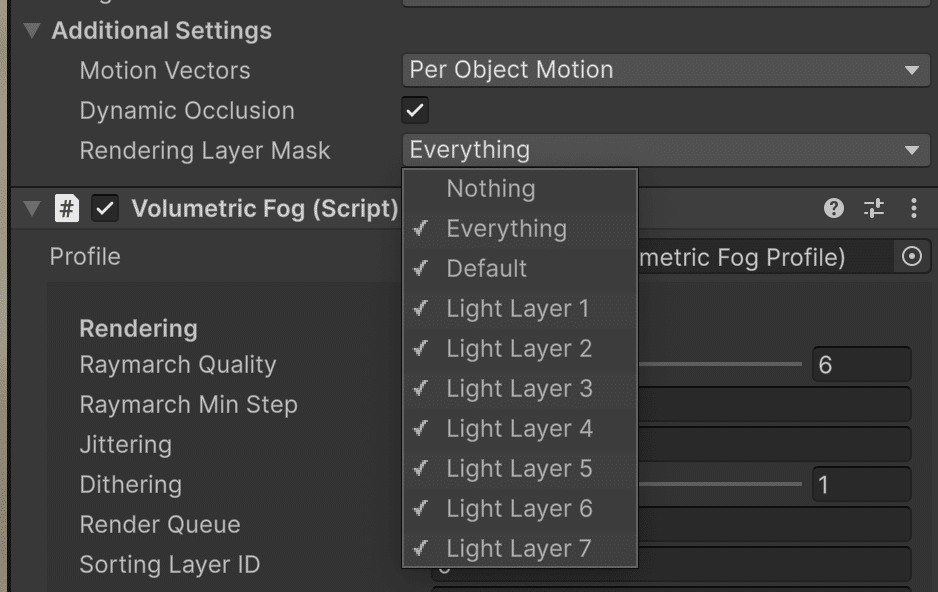
Step 3: Finally, in the fog volume gameobject, set the Rendering Layer Mask:
Point Lights
Up to 16 fast point lights can illuminate the fog volume using this option. This implementation is faster than the option to support native lights, however, this doesn’t support shadows. Also, if you enable native lights, this option won’t be available.
The Point Light Manager is responsible for sending the positions and settings of each point light to the shader.
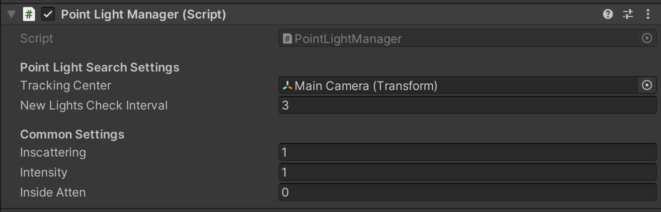
The Point Light Manager sorts lights by distance to the Tracking Center. You can adjust the time interval for checking new point lights in the scene. You can also call TrackPointLights(true) of this component to cause an immediate refresh.
The Inscattering and Intensity are global multipliers to the point lights range and intensity respectively. The “Inside Atten” setting reduces the point light intensity when camera is very near to the point light to avoid “screen burn” effect.
Important: this option requires you to add the FogPointLight script to each point light you want to be rendered in the fog:
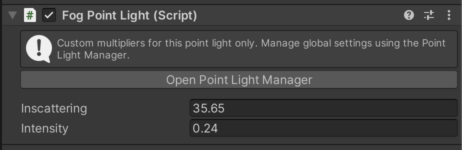
This script also allows you to specify custom in-scattering & intensity multipliers for each point light.
Note: fast point lights can bleed through geometry. You can enable the option “FAST_POINT_LIGHTS_OCCLUSION” editing the PointLights.cginc to force the shader to perform a depth occlusion test at the light position. This will hide the point light completely when it’s behind solid surfaces (this option affect performance).
Terrain Fitting
By default, the fog renders according to the selected shape (Sphere or Box) and the volume size. When enabling “Terrain Fit” in the profile, the fog will modify the vertical position to fit the underline terrain heightmap.
To use this feature please make sure that:
-
There’s a terrain (Unity terrain or mesh based terrain) under the fog volume.
-
The fog volume has enough size to cover the desired area of the terrain, both in horizontal extension and also from the base altitude to the desired top point of the terrain.
-
Use the Terrain Fog Height, Min Altitude and Max Altitude to customize the height range.
When this option is enabled, Volumetric Fog & Mist will capture the heightmap below its volume just once. It will automatically refresh the internal heightmap cache if the Volumetric Fog changes position or when calling the method ScheduleHeightmapCapture() of the VolumetricFog component (call this method if you work with procedurally generated terrains that are created or updated after the volumetric fog).
Check this video for an example:
Fog of War
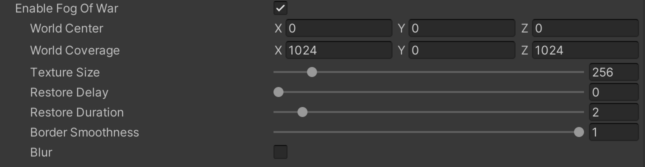
The fog of war feature uses a color texture to control the opacity of the fog on the world. It can be used to clear / add fog at any custom position. This feature is commonly used to show which areas of the world have been visited or are visible to the player.
-
World Center / Coverage: maps the fog of war texture to the world using this center and size.
-
Texture Size: the size of the fog of war texture. A big texture allows finer details but it can result in a slower operation.
-
Restore Delay / Duration: controls when the fog restores it original appearance. It can be used to allow the fog to disappear while the character is at certain position and gracefully restore the fog when character abandons the place. A delay of 0 means the fog won’t never be restored. A duration of 0 means immediate change (no transtition).
-
Border Smoothness: controls the smoothness of the border of clear areas.
-
Blur: produces a softer transition between clear and opaque fog areas.
Fog of War Editor
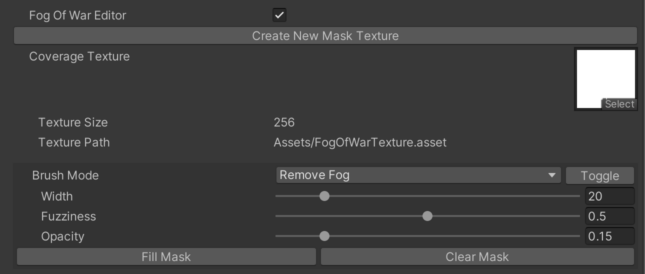
Enable the Fog of War Editor to interactively add, paint with color or remove fog in Scene View.
Click “Create new Mask Texture” to create the texture asset which will hold the opacity states of the fog of war.
The Brush Mode selects the paint/erase mode as well as Width, Fuzziness and Opacity allow you to customize the artistic result.
Transparency support
Customizing the rendering order
Each Volumetric Fog volume can have a different render queue setting, located in “Rendering Section”:

These settings allow you to control the rendering order.
The render queue decides the order only when the fog is rendered at full resolution, with Downscaling set to 1 and Blur and Scattering set to 0. When Downscaling, Blur or Scattering are used, the fog is composited once at the Render Pass Event of the Volumetric Fog Render Feature, so transparent objects drawn before that event appear behind the fog and transparent objects drawn after it appear in front.
Respecting other transparent objects
Volumetric Fog & Mist offers several ways to tackle transparent objects:
Option 1: Integrating the fog into the transparent shader (requires Shader Graph).
Option 2: Using custom Depth-Prepass and Depth Peeling (enabling it in volumetric fog manager).
Option 1: Integrating the fog into the transparent shader By using the custom function provided by the asset, you can alter the transparency of the object based on the amount of fog in front of it effectivly causing the object to blend or disappear correctly into the fog. Check the demo scene DemoShaderGraph for an example or watch the tutorial below that explains how to use the custom function node.
Important: when using the Lit shader graph, disable “Preserve Specular Lighting” in order to avoid undesirable highlights when object is occluded by the fog.
Option 2: Custom depth-prepass & depth-peeling options
The fog effect relies on the depth buffer to compute ray marching distance (that’s why you need to enable “Depth Texture” checkbox in the URP asset). Since transparent objects do not render to depth buffer, it means the fog effect will always render on top (or behind) of previously rendered objects depending on the render queue (for example water, rivers and any other transparent objects located between the fog and the camera may look incorrect either fully visible on top of the fog or completely wiped by the fog).
To avoid this issue, you should first try solving the issue by customizing the rendering order (see previous section). You can change the rendering order of Volumetric Fog volume or change the rendering order of the transparent material so one renders before the other.
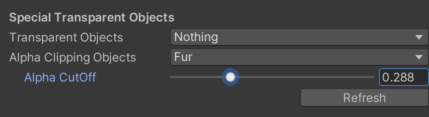
Alternatively, you can force a custom depth pre-pass for certain transparent objects from the Volumetric Fog Manager inspector. There’re two ways that can be combined: transparent and alpha clipping.
-
“Transparent Objects”: specify which transparent layers should be included in the depth pre-pass and be considered completely opaque. This option is designed for ocean, lakes and rivers: the fog stops at the water surface instead of continuing to the bottom. It does not change the drawing order, so the fog covers the water only if the fog is drawn after the water. See Water behind the fog, particles in front below.
-
“Alpha Clipping Objects”: for other kind of semi-transparent objects, like fur and hair. Increase the Alpha CutOff value.
Important note 1: These two options require installing the Depth Render Pre-Pass Feature in the Forward Renderer of the Universal Rendering Pipeline asset. Simply go to Project Settings -> Graphics -> Double click on the Universal Pipeline asset -> Double click on the Forward Renderer asset -> Add the “DepthRenderPrePassFeature” to the list:
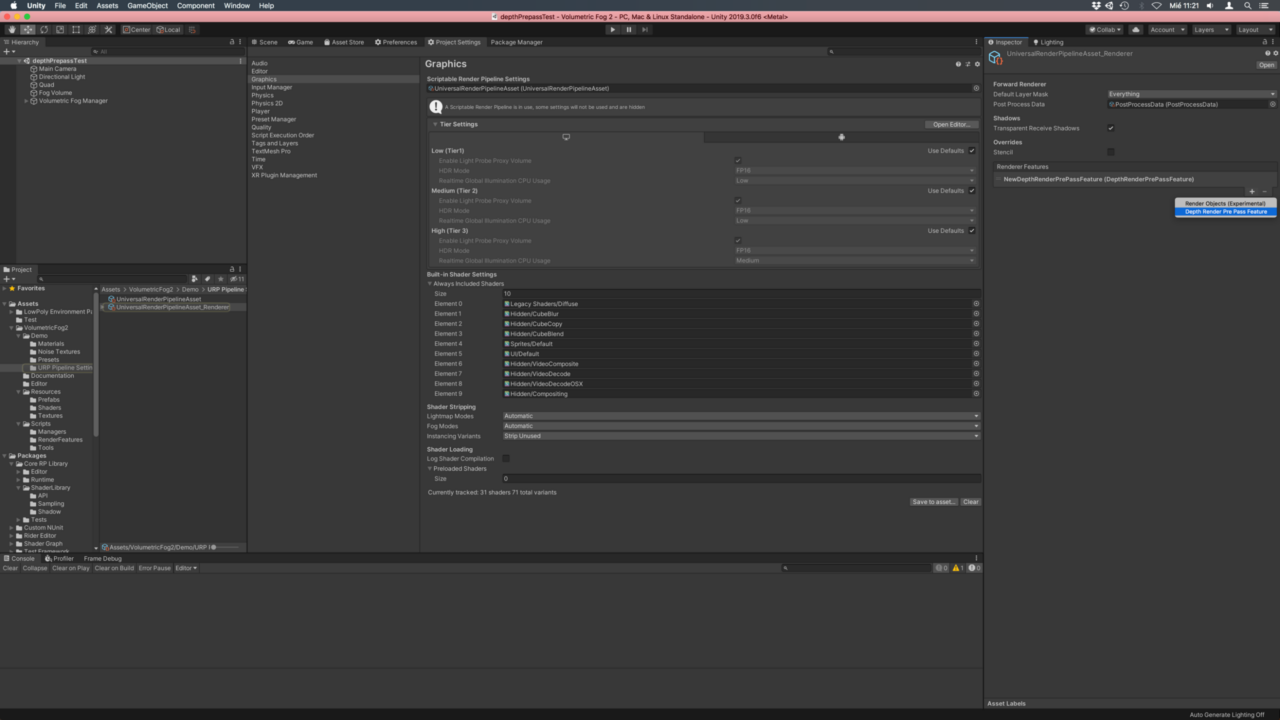
The Camera Layer Mask of the Depth Render Pre-Pass Feature selects which cameras run the pre-pass, using the layer of the camera GameObject. It does not select objects. Leave it on Everything unless you need to exclude specific cameras.
Important note 2: when enabling “Alpha Clipping Objects” option, the asset will find which objects are contained in this layer during start. If you create new objects in this layer at runtime, call VolumetricFog.FindAlphaClippingObjects() from a script to update the internal list of objects. You can also call AddAlphaClippingObject or RemoveAlphaClippingObject to add/remove support for specific objects.
Depth Peeling
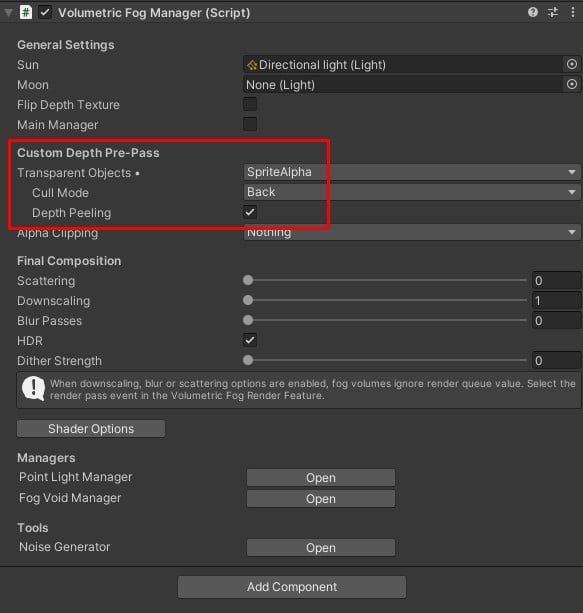
For more precise transparency support when using custom depth-prepass, you can use “Depth Peeling,” located in the Volumetric Fog Manager under the Transparent Objects section.
• Make sure** Depth Texture** is enabled, and Volumetric Fog Render Feature and Depth Pre-Pass Render feature are added to the render list.
• Set a custom layer for the objects that you want to be affected by this feature.
• Choose the layer in the Transparent Objects section and enable depth peeling.
Water behind the fog, particles in front
A common case is a transparent water surface under the fog and transparent particles, such as smoke, between the camera and the fog, with Downscaling or Blur enabled. The Volumetric Fog Render Feature composites the fog once, so with the default setup either the water is drawn over the fog or the fog is drawn over the particles. Depth Peeling also draws the fog over every transparent object, particles included. The following setup draws the water first, then the fog, then the particles, and keeps Downscaling and Blur working:
Put the water on its own layer (for example “Water”) and the particles on another layer (for example “Particles”).
In the Volumetric Fog Manager, set Transparent Objects to the water layer so the fog stops at the water surface. Depth Peeling is not needed.
Add the Depth Render Pre-Pass Feature to the renderer and leave its Camera Layer Mask on Everything.
Set the Render Pass Event of the Volumetric Fog Render Feature to After Rendering Transparents. The water keeps rendering normally in the transparent pass, before the fog.
Add a URP Render Objects feature to the renderer, below the Volumetric Fog Render Feature in the list, with Event = After Rendering Transparents (Before Rendering Post Processing also works), Queue = Transparent and Layer Mask = the particles layer. Render features with the same event run in the order of the list.
In the renderer, under Filtering, remove the particles layer from the Transparent Layer Mask. Otherwise the particles are drawn twice, once behind the fog and once in front of it. Keep the layer in the camera Culling Mask.
Other transparent objects that must stay in front of the fog can use the same Render Objects feature: add their layer to its Layer Mask and remove it from the Transparent Layer Mask. Transparent objects left in the regular transparent pass are covered by the fog.
Alternative, moving only the water: if most transparent objects must stay in front of the fog, keep the Volumetric Fog Render Feature at Before Rendering Transparents and add a Render Objects feature for the water layer with Event = After Rendering Opaques and Queue = Transparent. Then remove the water layer from the Transparent Layer Mask of the renderer and keep it in the camera Culling Mask. The water is drawn before the fog, and all other transparent objects are drawn after it, in front of the fog.
Particles inside or behind the fog (optional): particles drawn after the fog do not receive fog, even when they are inside or behind a fog volume. To fog them, use a particle material with the fog integration described in Option 1 (the DemoShaderGraph folder includes the ParticlesUnlitWithFog and SoftParticleWithFog materials) and add the Fog Transparent Object component to the particle system, with Auto Fog Volume enabled or the Fog Volume assigned.
Notes:
With Downscaling, a slight halo can appear on the ground along the water edge. It is more visible with higher Downscaling values such as 4.
Without Downscaling, Blur and Scattering, the same order can be obtained with render queues (water, then fog volume, then particles). In this case, if the fog volume does not render, set the Depth Texture Mode of the renderer to After Opaques (new URP 17.3 renderers use After Transparents by default).
Volume fade in/out and Sub-Volume support
Fading in/out the fog volume
Enable the “Fade” option in the inspector to make the fog volume invisible when the controller is outside the fog volume and make the fog appear smoothly as it enters the volume:

The Fade Controller is usually the player camera or the character controller.
Sub-volumes
Sub-volumes are zones that overlap a fog volume that modify the properties of the fog as the controller enters that sub-volume. For example, you may want to use a different fog density or color on certain areas of a fog volume.
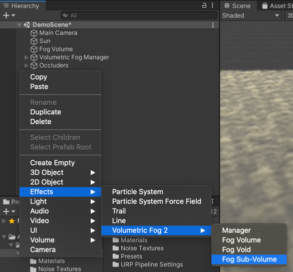
To create a new sub-volume, right click in the hierarchy and select Effects -> Volumetric Fog 2 -> Fog Sub-Volume a shown in this screenshot:
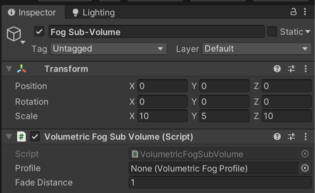
Then, position and scale the new sub-volume using the transform position/scale anywhere in the scene, and assign the desired new profile for that sub-volume and a blending or fade distance:
Enable Update Mode Options
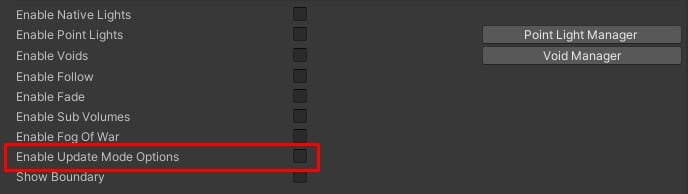
Each volumetric fog instance in the scene needs to perform some calculations and noise transformations every frame. This can result in an overhead if you have many fog volume instances in the scene. This option let you specify when the update takes place for each fog volume. The options are:
When Fog Volume is Visible: the fog volume will be updated only if it’s visible by the camera. Useful to avoid overhead from volumes that are far away or not visible in the camera frustum.
When Camera is inside an area: the fog volume will be updated only while the camera is within a specific boundary. This is useful to ensure the animation is consistent in an entire level or zone.
Suggest an improvement
Help us improve this documentation page.