Special Features
intermediate conceptsDynamic Fog & Mist 2 (URP) · Core Concepts
Sub-Volumes
A sub-volume is a localized area where fog transitions to a different profile. When the fade controller (typically the camera or player) enters a sub-volume, the fog smoothly blends from the main profile to the sub-volume’s profile.
When to use sub-volumes
- A general fog covers your entire level, but you want different colors or density in a cave or interior.
- You want fog to change mood when the player enters a specific zone (e.g., swamp, forest).
Creating a sub-volume
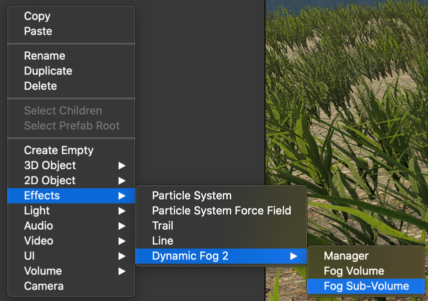
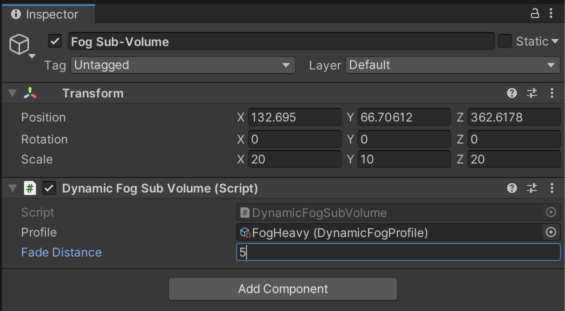
- In the Hierarchy, right-click and choose Effects > Dynamic Fog 2 > Fog Sub-Volume.
- Position and scale the sub-volume to cover the desired area.
- Assign a Profile with the desired fog settings.
- Set the Fade Distance to control how smoothly the transition happens.
How blending works
When the fade controller enters a sub-volume, the fog profile blends linearly based on distance to the nearest face of the sub-volume collider. At the boundary edge, the blend factor is 0 (fully main profile). At a distance equal to Fade Distance inside the boundary, the blend factor reaches 1 (fully sub-volume profile).
All profile properties are blended during the transition: density, colors, altitude, noise, light diffusion, and rendering settings. Boolean properties (like Depth Clip, Use XYZ Distance, Use Vertical Gradient) switch at the 50% blend point.
Tips for smooth transitions
- Make the sub-volume larger than the actual target area (e.g., extend it beyond doorways and corridors) so the player spends more time inside the fade zone before reaching the center.
- Use a larger
Fade Distancevalue (5-10+ depending on your scene scale). Small values produce abrupt transitions because the blend zone is very narrow. - The transition speed depends on which face the player enters from. Entering near a corner feels faster because you are close to multiple faces at once.
- If the sub-volume is placed so that the player enters through a narrow axis (e.g., a vertical ladder), consider extending the sub-volume along that axis to widen the fade zone.
Multiple overlapping sub-volumes
When multiple sub-volumes overlap, they are blended sequentially. The first sub-volume blends with the main profile, then the next sub-volume blends with the result, and so on. This allows layering different fog effects in the same area.
Fog of War
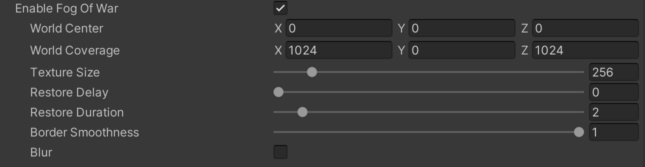
The fog of war system uses a 2D texture to control fog opacity across the game world. This is commonly used to reveal explored areas or show which zones are visible to the player.
Configuration
| Parameter | Description |
|---|---|
| World Center / Coverage | Maps the fog of war texture to the world using a center position and coverage size. |
| Texture Size | Resolution of the fog of war texture. Larger textures allow finer detail but use more memory. |
| Restore Delay | Seconds before cleared fog starts restoring. Set to 0 to prevent automatic restoration. |
| Restore Duration | Time for fog to fully restore after the delay. Set to 0 for instant change. |
| Border Smoothness | Controls edge softness of cleared areas. |
| Blur | Produces a softer transition between clear and opaque fog areas. |
Fog of War Editor
Enable the Fog of War Editor to interactively paint or erase fog directly in the Scene view.
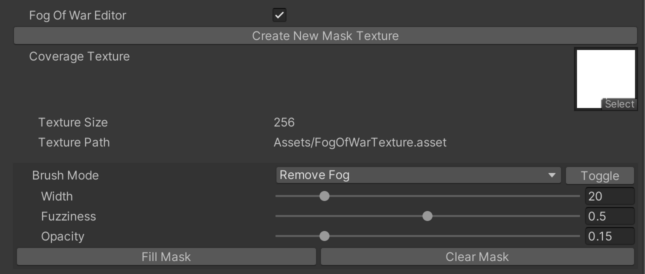
- Click Create new Mask Texture to create the asset that stores fog opacity data.
- Choose a Brush Mode (paint or erase).
- Adjust Width, Fuzziness and Opacity for artistic control.
- Click and drag in the Scene view to paint fog areas.
Orthographic Camera Support
Dynamic Fog supports orthographic cameras. To enable this, locate CommonsURP.hlsl in the package files and uncomment the following line:
#define ORTHO_SUPPORTTransparency Support
Customizing rendering order
Each Dynamic Fog volume has its own Render Queue setting in the Rendering section of the component. This lets you control whether fog renders before or after specific transparent objects.

Working with transparent objects
The fog effect relies on the depth buffer for ray-marching distance calculations. Because transparent objects (water, glass, particles) do not write to the depth buffer, the fog may render on top of them regardless of their position.
Solutions:
- Adjust render queue — set the fog volume’s render queue to render after specific transparent objects.
- Layer-based exclusion — use sorting layers to separate fog from transparent geometry.
Suggest an improvement
Help us improve this documentation page.