FAQ
beginner faqBeautify 3 (URP) · Troubleshooting & FAQ
Is this asset compatible with Unity 6?
Yes. All Kronnect assets are fully compatible with Unity 6. The minimum supported version is Unity 2022.3 LTS, and this includes Unity 6 and any newer releases.
How to change brightness, contrast and other properties at runtime?
Check the Demo.cs script included in the first demo scene for sample code. For instance, you could use:
BeautifySettings.settings.brightness.Override(0.5f);Also check the Scripting (C#) section for more details about how to control Beautify (URP) using scripting.
How to exclude UI or 2D elements from Beautify effects?
You can use the Bloom and Anamorphic Flares exclusion layer option to exclude opaque objects only. To exclude 2D or UI elements, consider the following possibilities:
- Use Canvas set to Overlay Mode.
- In URP you can set the Render Event to Before Transparent in the Beautify Render Feature. Or use a second camera to render your 2D/UI elements (note that Direct Write to Camera option is not compatible with multiple cameras). Use the Camera Layer Mask of Beautify Render Feature to limit Beautify effects to certain cameras,
- In Built-in pipeline, you can edit Beautify.cs and add [ImageEffectOpaque] before OnRenderImage so Beautify effects are applied before transparent objects are rendered.
How to assign a LUT at runtime?
Check the Demo.cs script included in the first demo scene for sample code. For instance, you could use:
BeautifySettings.settings.lut.Override(true);
BeautifySettings.settings.lutIntensity.Override(1f);
BeautifySettings.settings.lutTexture.Override(lutTexture);
Similarly, to disable the LUT effect, you can just deactivate the override state or override the lut value to false:
BeautifySettings.settings.lut.Override(false);Also check the Scripting (C#) section for more details about how to control Beautify (URP) using scripting.
Beautify's effects are missing, what can be the main cause?
In order to avoid this issue, you need to set Beautify Renderer Feature on the Right Universal Renderer Data. To add it, follow the steps below:
• Go to “Edit – Project Settings”
• Choose the “Graphics” tab and double-click the scriptable render pipeline data file.
• Now double-click again the Default “Renderer Data File” and finally add the Beautify Renderer Feature.

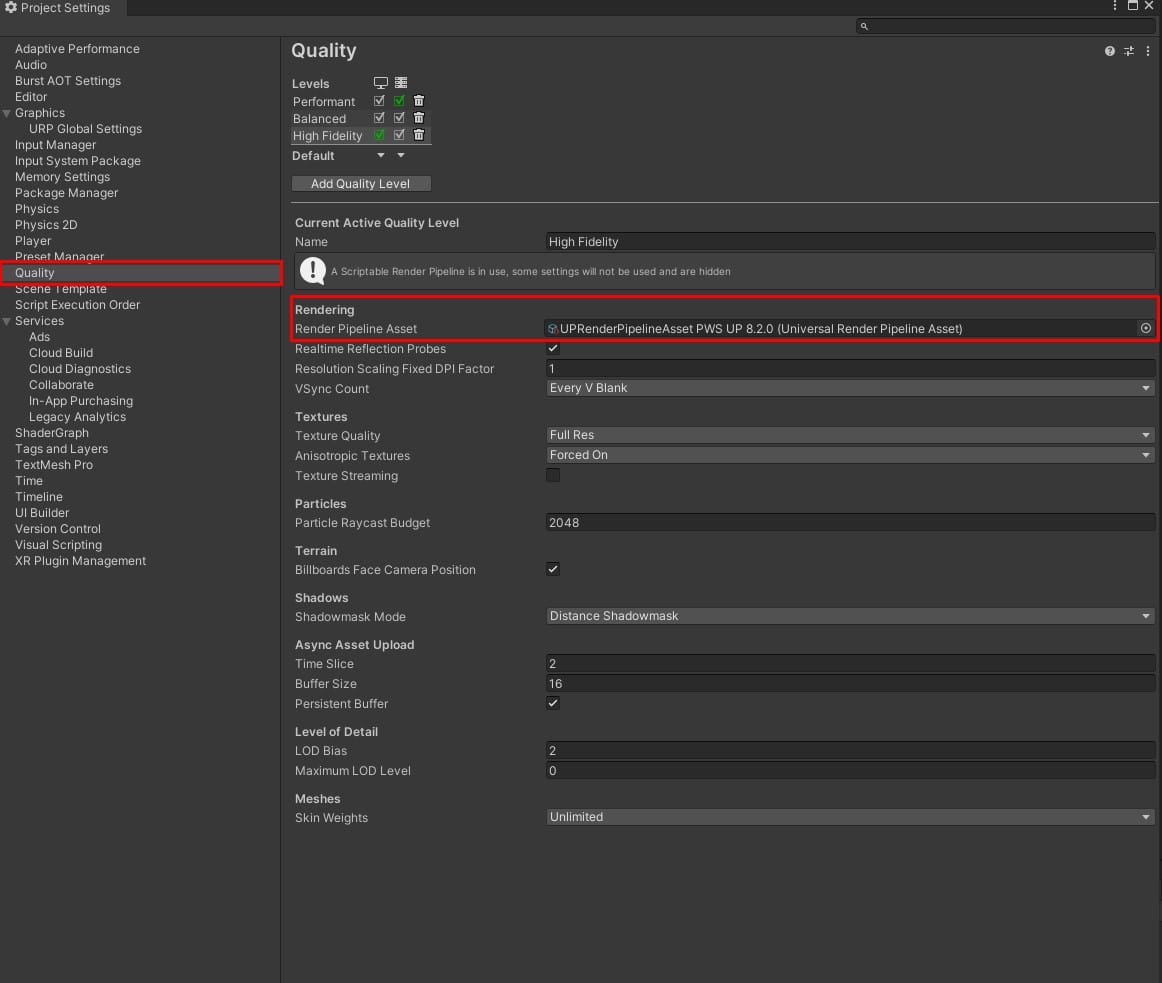
Additionally, you need to check the “Render Pipeline Asset” under Project Settings – Quality. There you can have one URP asset per quality level and it will be used if assigned instead of the Project Settings / Graphics one, which acts as the default URP asset in case there’s no specific URP asset assigned to a quality level..
That’s it, your problem should be solved if you followed the steps correctly.
There's a glowing edge when using Beautify on VR.
Disable the “Ignore Postprocessing” option in the Beautify URP renderer feature.
My 2D lights disappear when using Beautify in my 2D URP project.
This is because the Beautify Render Feature is not added to the render list. Go to Projects Settings – URP Asset – Universal 2D Render Data and add Beautify to the render list.
How to enable/disable depth of field effect via scripting?
Please, use this code example to adapt it to your scripting needs:
using UnityEngine;
using Beautify.Universal;

namespace Beautify.Demos {

    public class ToggleDoF : MonoBehaviour {

        void Update() {
            if (Input.GetMouseButtonDown(0)) {
                // toggles DoF state by overriding the volume property
                bool state = BeautifySettings.settings.depthOfField.value;
                BeautifySettings.settings.depthOfField.Override(!state);
            }
        }

    }
}
Can I add different Beautify effects for the scene and the UI?
Camera stacking in URP works by passing the output generated by the previous camera to the second camera. So the second camera writes on top of the contents of the previous camera. This means that any post processing applied to the second camera will also be applied to the contents of the first camera. The only way to have completely differentiated post processing on camera 1 and 2 requires rendering the first camera to an off-screen buffer (such as render texture) and using a custom render feature and shader to combine this render texture with the results of the second camera.
I have a question which is not covered in the guide...
Please use the Kronnect Support and post your question there. Our team will get back to you shortly.
Effects look different in build vs editor
This is almost always caused by different URP assets being used per Quality level. In the editor you use one quality setting, but the build may pick a different one.
Check Project Settings > Quality and make sure every quality level enabled in your build has the same URP asset assigned, or at least the same Beautify Renderer Feature configuration.
If certain effects (sharpen, depth of field, outline, bloom depth attenuation) are missing in the build, check the ignoreDepthTexture option in the Beautify volume. When this is disabled (default), Beautify automatically requests the depth texture from the pipeline and all depth-dependent effects work. If it's enabled, depth-based effects will be disabled to save performance.
Quick way to reproduce: set the editor to the same quality level as your build target and check if the issue appears there too.
Why does the Depth of Field target reset when undoing slider changes in the editor?
The Beautify profile in URP cannot store scene references, so the DOF target is stored separately in the BeautifySettings component rather than in the profile itself. When undoing profile changes, the target reference may be reset as a side effect. As a workaround, you can set the DOF target through code at runtime instead of in the editor, which avoids this undo issue.
How can I enable a Beautify feature for runtime modification while keeping it disabled by default, without losing the performance benefits of stripping unused features?
Don't use the Automatic Strip option. Instead, expand the strip settings and manually select only the features you know you won't use. This allows you to keep specific features like Depth of Field available for runtime modification while still stripping other unused features.
How do I fix water shader issues that only occur when Beautify is enabled in URP?
Change the Beautify render event to 'Before Transparents' in the settings.
How do I toggle Beautify post-processing effects on and off at runtime using overrideState?
Set the overrideState property for the desired effects (e.g., chromaticAberrationIntensity.overrideState, vignettingInnerRing.overrideState, etc.). If the settings don't persist after scene reload, call BeautifySettings.UnloadBeautify() before modifying the properties to ensure proper reinitialization.
How do I change anamorphic flares intensity via script in Beautify URP?
Call BeautifySettings.UnloadBeautify() before modifying the property. This removes any link between the singleton BeautifySettings shortcut and a previous volume, ensuring it will modify the current profile in the scene. Then use BeautifySettings.settings.anamorphicFlaresIntensity.Override(value) to set the intensity.
What settings should be adjusted to improve Beautify URP performance on Quest 2?
For Quest 2 performance optimization: set Downscale to 2, use Depth Texture Mode = Force Prepass (most performant), disable Clear XR color buffer, enable Multi-View instead of Multi-Pass, and refer to the official performance tips guide at https://kronnect.com/guides/beautify-urp-performance-tips/. Also check Project Settings / Oculus recommendations.
How do I prevent build errors when using multiple Beautify profiles with shader stripping?
Ensure the Beautify Render Feature is added to all URP assets in Project Settings > Quality. Only use the stripping options in one volume to avoid conflicts. If you want full control, you can comment out unused shader keywords directly in the code (each keyword is self-descriptive), or use the Shader Control tool to disable keywords from the inspector instead of editing code.
How can I improve outline quality and prevent visual artifacts when adjusting outline settings in Beautify URP?
Increase the depth diff setting for better results. For optimal outcomes, use the Per Object Id technique to control outlines on a per-object basis rather than making large global adjustments that can cause visual instability.
How do I disable specific sections of Beautify through code when using multiple URP volumes?
Beautify follows the URP volume system. The BeautifySettings shortcut only affects the main volume. When using multiple volumes, you need to get a reference to the VolumeProfile used in each volume and update the settings directly on those profiles. See the scripting tips documentation for examples with other post-processing effects.
How can I reduce the large amount of RAM that Beautify uses when the game starts after building?
Disable every feature you don't need in the build settings. For features you will always use, they can be replaced by defines as explained in the documentation (https://kronnect.com/guides/build-tips-beautify-urp/). This will save unneeded shader variants. You can check how many shader variants are being generated by looking at the build log or using a tool like Shader Control.
Does disabling shader features through defines impact runtime RAM consumption in addition to build size and build time?
Reducing shader variants through defines will impact build size and build time. At runtime, Beautify primarily consumes VRAM (video memory) from shader binary code, not system RAM. The RAM shown in memory profilers is from shader binary code, not from Beautify's runtime operation.
How can I exclude specific objects from Beautify's blur post-processing effect?
Post-processing effects don't natively support layer masking. You have several alternatives: (1) Render the object to a different camera entirely (though this impacts performance), (2) Use the Transparent render queue to render the object over blurred content without making it transparent, (3) Use a separate Gaussian blur shader with a plane positioned behind your object instead of relying on Beautify's post-processing, or (4) If you want blur behind an examined object, consider using Depth of Field adjusted to the distance of that object instead.
What do the checkboxes in the Beautify Render Feature stripping options mean?
Checked = exclude/strip that feature from the build. Unchecked = include the feature. The stripping options are global and affect all scenes during compilation.
Why are Beautify changes not taking effect in the scene even though settings are configured?
Check if you have multiple URP assets configured in Project Settings > Quality. During builds, a different URP asset with different stripping settings may be selected, overriding your configuration. Ensure all Quality level URP assets have consistent Beautify stripping settings.
How do I configure Beautify's Depth of Field to have objects at different distances blur with different intensities, rather than blurring uniformly?
DoF blur is gradual from the focus distance point. Objects closer to the focal point blur less, while objects farther away blur more intensely. Adjust the Focus Distance to set where the sharp focus point is, then increase both Focal Length and Aperture values to control the blur gradient. You may need to set Focal Length to a high value to achieve the desired effect. The blur strength increases with distance from the focal point.
How can I make anamorphic flares dynamic on specific objects at runtime?
Use the layer mask feature to specify which objects can produce anamorphic flares. If you need dynamic control, you can change the layer that the light is on via script at runtime.
In Beautify 3 for URP, how do you switch between different effect settings at runtime, similar to profile switching in Beautify 2?
Beautify 3 for URP uses the URP volume framework based on volume profiles instead of its own profile system. You can create different volume profiles with custom settings and assign them to the volume component. At runtime, you can swap between volume profiles to change effects (for example, switching to an underwater effect when the camera enters a specific area). The built-in pipeline version of Beautify still uses its own profiles, but URP uses the more generic volume profile concept.
Why are Beautify shaders being included in builds even when not needed?
Beautify shaders are stored inside a Resources folder, and Unity automatically compiles and includes anything inside Resources folders in builds. To reduce build size, you may need to reorganize shader placement or use conditional compilation.
How does the layer exclusion mask work with sharpness in Beautify URP?
The layer exclusion mask excludes sharpness from the specified layer, but it operates on a per-pixel basis rather than a per-layer basis. If another layer that is not excluded is rendered on top of excluded layer pixels, those top pixels will lose sharpening as well, since the exclusion is based on the pixel location rather than layer priority.
What causes a 'renderer is missing or invalid' error in the URP asset list?
Some renderer is missing or invalid in the list of the URP asset. A fix was provided by the developer that prevents an error if this happens. As a workaround, try removing and re-adding all entries in the RenderList, ensuring the UniversalRenderPipelineAsset_Renderer is placed first.
How can I apply different outline colors to different object layers, such as white outlines for default objects and red outlines for enemies?
Beautify does not support multiple outline colors natively. To achieve this, combine Beautify with Highlight Plus: apply Beautify before the transparent pass for the default layer, and use Highlight Plus for enemy outlines with different colors.
What causes a split and horizontally flipped visual artifact when using Beautify on Quest 3 in URP with Vulkan single pass rendering?
This issue occurs when foveated rendering is enabled. Beautify does not yet support foveated rendering. Disable foveated rendering in your Quest 3 VR setup to resolve the artifact.
Why does Depth of Field not apply correctly to Spine 2D assets when they are not positioned over other assets?
Enable the Transparency support option in the Beautify settings. This option is located in the configuration panel and allows Depth of Field to work correctly with transparent or layered 2D assets.
How can I implement dynamic brightness/exposure adjustments in different areas of my scene without a volume system?
Beautify offers two alternatives: (1) Use Eye Adaptation, which provides automatic exposure adjustment based on scene luminance with configurable min/max exposure, transition speeds, and center weighting in the inspector. (2) Use scripting with trigger colliders to change Beautify settings via the API when the player enters different zones, adjusting brightness, contrast, or exposure values dynamically.
I have a question not covered here
Please visit the Support Center and use our AI Support Assistant to get answers. If the issue persists, submit a reproduction project so we can investigate further and help you.
Suggest an improvement
Help us improve this documentation page.